My 8
years old today son said he wanted to bring cupcakes for his class birthday
treat this year. I had tried to get him on board to a St. Patty’s Day theme,
but he wasn’t having it. So after some quick searches for ideas online we
settled on these Cake Cones. I had seen the idea before, but never attempted
them, so this was my first go at it. The recipe I followed was found at instructables.com and posted by scoochmaroo. However, after starting
the process I noticed it was also on the side of the Keebler Ice Cream Cone
box.
Supplies:
- Disposable muffin tins
- Ziploc bag (gallon size)-optional
- Ice cream cones
- Cake batter of your choosing
- Frosting
- Sprinkles or other toppings
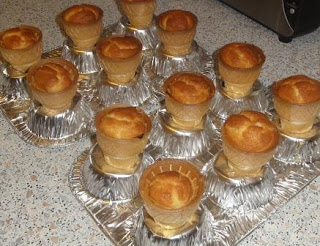
Flip
muffin tins over and cut holes out from centers to make ice cream cone stands.
This will give a stable holder for filling, baking and transporting. Another
site suggested cutting the bottoms off cardboard egg cartons or wrapping foil
around base of cone, then pressing it into upright muffin tin. I chose this
method since it sounded the most stable and attractive.
Once holes are cut insert cones. If
the holes aren't cut too big the cones should be held securely in place.
Mix
batter of your choosing. I went with boxed mixes in white and German chocolate,
and followed the recipe as listed on the box.
You can then begin to fill cones
about 2/3 full. To do this I put the batter in a Ziploc bag and cut a
corner off. This made filling super easy and I didn’t have any drizzle that
would burn onto the cones during baking.
They
should be filled a little more than pictured to get a nice full look when
finished.
Step Three:
 Bake at 350 (175C) for 20-30
minutes. The cones will not discolor at this temperature and the tins will
ensure they stay upright. Be sure and check doneness by sliding a skewer or
knife to bottom of a cone.
Allow
cone cakes to cool completely before frosting. Then cover entire top. I
used vanilla in the self-dispensing can in hopes of making it look like soft
serve or whip cream topping. Had I been able to find whip cream topping I would
have used it. Then sprinkle with whatever cake or ice cream decoration you want.
My son chose chocolate and multi sprinkles. I think crushed nuts would look
nice on top, but since this was for a school treat, we had to be wary of any
peanut allergies. You could also add a cherry on top to finish the look; my son
was against this idea and it’s his special day!

If you have the time and ability to make regular cupcakes you can make these! They are super easy and turn out really cute with little effort. The kids love the surprise of cake inside and I’m sure this treat will become a fast favorite.
Tip: To
aid in transporting these treats I put the muffin tins inside
large roasting pans with ‘Chocolate’ and ‘Vanilla’ written on the outsides. I placed
the tins w/cones in the pans before frosting to help contain the mess.
The kids were then able to just pull the cone of their choosing out and enjoy!
Added bonus-No cupcake wrappers to dispose of!


I can just imagine his classmates wondering why the ice cream is not melting!
ReplyDelete