4/19/2012

Garden Planters

I survived Spring Break. My oldest is back in school this week and I feel like we accomplished a lot during his vacation. The weather warmed up enough for us to plant flowers and my son really enjoyed helping put a planter together for our front porch. This idea came from Pinterest in the form of a bird bath. Click here to check out the original project. I altered it slightly to be completely made out of containers and took away the bird bath top. This is great for those short on space or just looking for something different.

Supplies:
  • Large planter (Mine is about 15" tall)
  • 4-6 smaller pots (I used 6" plastic)
  • Re-bar (however tall you want your pots to stack)
  • Soil
  • Flowers

I reused a large plastic pot that was actually sitting in the garage when we moved in. A quick layer of chocolate brown spray paint and it was looking like new! The re-bar also cost me nothing as it was tucked in some bushes next to our house as well. It was about 40" tall. I then bought 5-6" plastic pots and sprayed them all red. They did not come with drain holes in the bottom, so I used my dremel for this and made them about the same diameter as the re-bar. 

Once everything is ready (and dry/chip proof if painted) it's time to assemble the structure. Fill the large pot with soil and pack it down slightly. Then insert the re-bar in the center. Then simple slide each small pot down the bar through the drainage hole and lean them to opposite sides. Now fill the smaller pots with soil and plant your flowers! 

Super easy and looks great tucked in the corner of my porch. I have gotten a couple thumbs up from my German neighbors already!

Total cost $10. It would have been slightly more had I needed to purchase the large pot. I also had the plastic spray paint on hand for another outdoor project. 


**UPDATE**
The planter is holding up well and we even have had some pretty strong winds. The only thing I would change next time would be to paint the re-bar to match the planters or at least a nice black. If the holes are drilled large enough there shouldn't be any scraping when the pots are slid on. Also-My pots have settled some and there is now about 2-3" of bar coming out the top. I am on the hunt for some sort of non-cheesy garden statue to plop on or glue to cover this....

4/03/2012

Easy Outdoor Play Tent

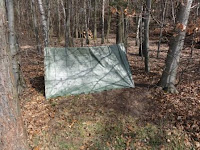
I can't believe it's April already!! With the weather getting warmer I've really been focusing on my outdoor setup. We are super lucky to have a forest right behind our home. It offers so much fun and exploring for my boys. My oldest spends most of his non school time playing outside and recently asked if we would build him a fort. Now, of course I want to...However, building a structure would mean we'd have to leave it behind with our inevitable move. And since we have less than a year left at this location I am not too excited about building something myself. So I decided I'd whip up something to meet his wants, but something that will allow for mobility, easy clean up and hours of fun for the kids. So here is my solution:

The simple triangle tent has been used for I don't know how long. We've all seen 'em, but for some reason I never thought about putting one in my back yard for the kids...that is until I stumbled upon the idea on pinterest. Here is the site that inspired my setup (Make a Tent). Based off the same idea I tweaked it to make it suitable for boys and easier clean up than using a sheet.

Supplies:
  • 4 tent stakes ($2 total)
  • 1 large tarp or canvas w/grommets ($9)
  • Rope (already had some)
Step one is to find a location for the tent. Two trees work well, but a clothes line or swing set bar would work just as well. Once you have the spot, tie one end of your rope (I used 550 cord) to a tree between 5 and 6 feet up, lower if you have younger kids.  The line will droop once the tarp is on it and staked down, so keep that in mind. 


The type of knot used is up to you, but if you're like me and knew very little about knots until attempting this project, then here is a great tutorial for a simple taut line. Make sure the knot is tight, then repeat same style knot on other side. Keep the line tight while doing the other side to make sure it stays tight when done. Trim the ends of the rope if needed. 


Now you are ready to drape your tarp over the line. I used an 8x10 tarp that had a camo print on it. I am not a fan of camo...I see enough of it daily; I flipped it so the camo print was on the inside and the outside was then a solid green. The tarp already had grommets so I simply staked it down with my tent stakes and was done! 


It took $11 dollars and about 10 minutes of my time before I had the perfect tent for hours of play fun. It's large enough to easily fit my 8 year old and 4 of his buddies with room for gear. I am looking into finding some kinds of floor or rug to put under it and a couple chairs or a child's bench. Perhaps a locked crate containing a canteen, binoculars and other outdoor necessities would add to the overall feel. All in all, this was super cheap and easy and as you can see my son is thrilled to have his own space in the yard. He's already talking about putting a 'No Girls Allowed' sign up...